File Explorer
The File Explorer screen is the main working environment within PROJECT in a box. Here users view, and change their project documents and files as well as modify the file explorer tree structure telling the system where to keep and show particular documents/files. Most of the help associated with particular functions activated from within the File explorer are discussed in other help topics, this topic will provide an overview of the form and how to navigate within it.
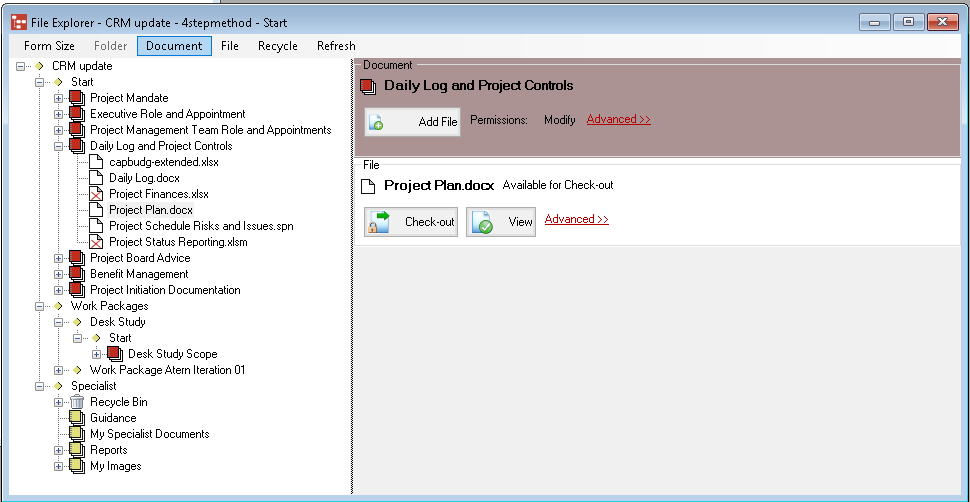
The File Explorer has its own menu: Folder - only available when clicked on a folder (folder symbol) in the file explorer tree this provides access to the functions available from a right click on the same folder symbol, namely rename folder, delete folder and add new folder (subject to permissions). Document - only available when clicked on a document (multi sheet and cover symbol) in the file explorer tree this provides access to the functions available from a right click on the same document symbol, namely add file, URL or Windows shortcut to document, rename document, add new document here, add existing document here, remove document from process, recycle document from project and Document report (subject to permissions). Also provided are the controls for reordering the position of the Document within the currently shown process: Move up, Move down, Move to top, Move to bottom (only available to a modify user on the project or an admin user). Finally users with appropriate permissions can also access the notifications form or edit document tips. File Actions - only available when clicked on a file (paper symbol) in the file explorer tree this provides access to the functions available from a right click on the same file symbol, namely view, check out, check in, undo check out, remove file, check out to email (subject to permissions) and Show file URL. If you have modify permissions on the parent document a delete option will also display. Recycle - only available when operating in document and file areas and if you are a Modify user on the project it allows the entire recycle bin for the project to be emptied in one go. Refresh - this forces the client to return to the server and check that the information on the file manager is current. You can also refresh the File explorer at any time with the F5 keyboard shortcut. The File Explorer screen is divided into two main areas:
Since version 2.3 the colour of the panes, text and links in the File explorer has been able to be defined by the Method Template and the new Method templates released with this version have different colour arrangements so it is clear to the users which type of project is being worked on. The File Explorer tree view is used in the same way as a traditional windows explorer tree, branches are opened or closed using the + or - sign boxes on the left of the tree.
Very importantly the default tree arrangement view shows the management documents that are recommended in your current project method type to be produced, reviewed or communicated at this particular sub-process. [Please Note: some users can edit the Method Template for your project and add or remove documents and files from the structure if they have sufficient permissions, this may mean that your actions are not completely in line with the standard method.] Hovering over documents in the tree will show you guidance hints or tips set up and these will be specific to this document in the current process. A standard set of hints/tips will be populated from the Method Template for your project or may be altered by a user with Modify permissions on the document. Clicking on items in the tree will activate or deactivate menu options in the Main menu depending on the item type clicked. If documents or files are clicked then details for these will be returned from the server and displayed in the Document manager pane. The structure and layout of the File explorer tree is consistent at the top level but can be manipulated by users at it's lower levels. The top level is always in the order:
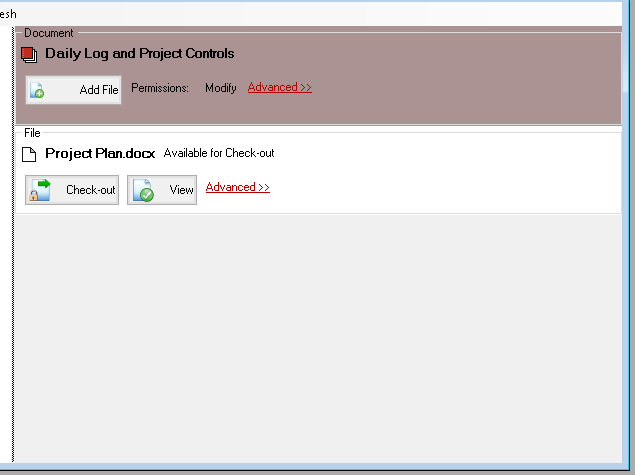
The tree uses a number of different icons to signify information about the various documents or files shown, as follows: Red Document - Management Product only used in the current project Tan Document - Specialist Product only used in the current project. Blue Document (with letter S) - Document and any content files shared between the current project and one or more other projects on the server (hover or run a document report for further information about the shares). White paper - Normal project file held on the server for configuration management purposes and is available for checkout to a user with sufficient permissions. White paper with red cross - Normal project file held on the server for configuration management purposes which has been checked out by another user and can currently only be viewed. White paper with blue cross - file which is currently undergoing an approval process and as such cannot be checked out or recycled.. White paper with black arrow - Either a URL or Windows shortcut type of file. Dustbin icon - Only in Specialist area it is created by the system automatically to host any files, documents or folders from the project which are recycled (removed frm generl user view). Only visible for Modify users on the project and cannot be removed or moved. Located just above the File explorer tree view is the tick box which controls the Index Function. This enables the file explorer tree to be turned into an alphabetic 'Index View' showing all documents and files in the entire project, or back again to its default 'Process View'. Next to it is a 'Refresh' link which will force a refresh of latest status data for all documents and files in the currently selected sub-process. The Document manager pane is populated to reflect firstly which document and secondly which specific file has been selected from the tree view. This means that when no document or file are selected in the tree view that part of the Document manager will appear blank. The Document and File areas can be operated in Simple or Advanced modes as is shown here in the two images below.
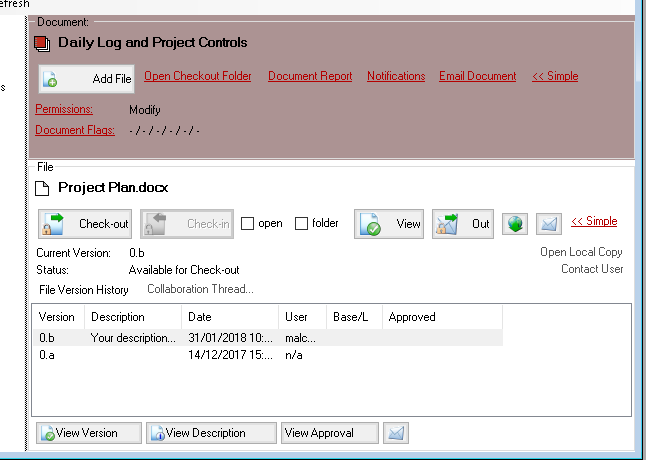
The document manager itself is subdivided to help understand it. At the top level is the Document and the appropriate type of document icon for the project will display along with the document name to head it's 'pane'. Controls exist at the top of the document to enable users to add a new file to the document and to send a copy of the entire document via email. This area also displays on the left your permissions level for this particular document (and the files contained within) and any document flags set for the document. If you have sufficient permissions to alter the document permissions settings or modify any of the document flags then these will be shown as active links and will open the appropriate forms. On the right side of the form a direct link titled Open checkout folder. which will take you to your checkout folder for the current project. Finally you can run a Document Report on the current Document or set Notifications on it (these links will only be active if you are a Modify or the Admin user operating from a Manager Licence). Below the document pane there is a File pane and this shows all the information on the file the user currently has selected. Working down the pane, the file is named and its appropriate icon shown then its current version number and status are given. Since Version 2.3 the version number shown here can be customised so it may not be just a single digit such as 7 but rather a more sophisticated version such as 1.3.c. If the file is currently signed out to a user then the Contact User link next to the status dialogue will provide immediate access to the user's details. If the file is currently checked out to you then the Open Local Copy link will be showing active and clicking this will reopen the checked out file currently stored in your check-in/out folder. Below this are the conventional controls for checking in and out or viewing or the file. These buttons like all buttons in the file explorer light up or gray out depending on the context and user permissions for the document. i.e. if a document is already checked out the 'check out' button will be gray and the Check in with be lit. Also present here is the URL shortcuts button which provides access to the unique direct URL for the current file. This set of buttons apply to the current version of the file as listed above. Below the current file area is the link to a collaboration thread related to this file and then the history for the file currently selected. This can be set to be hidden (rolled up) or shown (rolled down). This shows users when changes have been made to the file, who by and the comments that that user chose to leave. It also shows whether users chose to set a Baseline flag against each particular version of the file. Also shown against the history of a particular version is any approval record, either self approved (during a check in exercise) or a multiuser approval exercise which might be in progress, completed successfully, unsuccessfully or failed. Details of the Approval can be accessed with the show approval button at the bottom of the history pane. In this history pane user can choose whether to just see the Version number or to also see the system count for the version (if you want to know how many controlled changes have been made). The system version count is switched on and off with an option on the options form. Users can click on an historical version to select it in the row and the controls at the bottom of the pane then allow them to view the full file, send a copy by email or to view longer comments in detail. Alternatively double clicking an item in the history list will automatically open it for viewing. Envelope icons can be seen throughout the Document Manager area and these indicate that things can be sent by email. What is sent is determined by the location of the envelope icon. In the document level it will send a current copy of all files in the document. On the current file it will send a copy or checkout of the current file and in the history it will send a copy of the particular historical version selected. |